") |
") |
") |
") |
 |
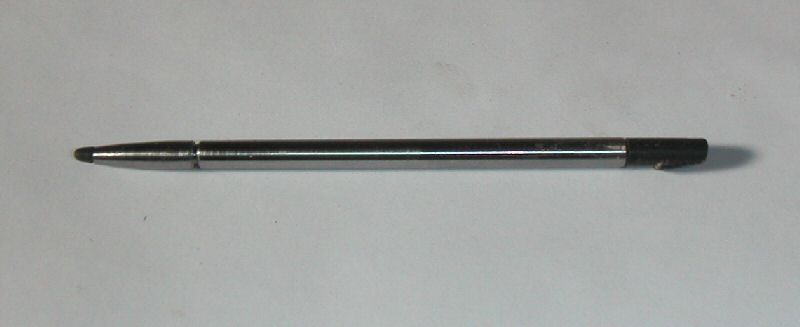
The finished stylus
|
Tip unscrewed - showing
the addition of the flat-bladed screwdriver
|
Tip screwed in, leaving
the click-stop locating band
|
Top unscrewed to
revealthe reset pin
|
Another view of the
finished stylus
|
|
|
|
|
|
 |
 |
 |
 |
 |
The original design
sketch. Dimensions were taken from my
stylus and recorded in imperial and metric as I knew some parts wouold
be made on the Myford (imperial) and some on the Unimat (metric)
|
The tip design and the
original design for a split body that
would also house a crosspoint blade. In the event, Pete's birthday was
looming fast so I used the old software project manager's adage - if
you're behind schedule, jettison functionality, not quality.
|
Having turned the body
to diameter and drilled for the cap,
the next step was to tap M4 to accept the threaded cap.
(Yes, I know the oiler's a bit low!)
|
The body was then
reversed, and drilled ready to accept the
screwdriver blade. Then the end was turned and an M4 die
run
down. Originally, the idea was to soft-solder the blade in but the
blade (cut from a watchmaker's screwdriver) was such a good
fit
it was press-fitted in in the vice.
|
On my stylus, the
plastic reset pin is bent over because it
is only 1mm dia and being moulded plastic, rather weak. For
Pete's version I decided this would be stronger if I turned a 1mm
aluminium pin and press-fitted this into the cap. Using the Unimat to
do this ensured the pin was exactly square to the cap.
|
|
|
|
|
|
 |
 |
 |
 |
 |
The Tungsten stylus has
a little finger catch to pull the
stylus from the PDA. After thinking about how to do this for a long
time I decided to make the catch as a separate piece of Delron let into
the turned cap and then shaped to fit. Luckily I had just the right
diameter milling cutter to mill the slot - shown above.
|
A separate piece of
Delron was then turned to be a light
press-fit into the milled slot in the cap. To ensure it seated
correctly, a flat was milled in the pillar drill with the job
held in a cross-vice.
|
Having milled the flat,
the part was reversed and sawn-off
(using the saw blade from the Dremmel) and cut to the cap diameter plus
the extra height for the finger catch.
|
The prepared insert was
then glued into the cap. There is a
slight design flaw here. In use, Pete pointed out that if you drop the
sytlus into the PDA and the finger catch is not aligned with the slot,
it hits the PDA body and puts a lot of load on the glue - which has
come unstuck and needed re-gluing. A better design would have been to
have milled a blind slot in the cap (like a mortice & tenon) so
the
load was taken by the plastic and not the glue.
|
The tip was surprisingly
tricky to make. The Palm stylus has
a nice continuous curve to the end cap. This was approximated
by
taper turning at two angles and then hand-blending the curve. The depth
of the drilled hole to house the screwdriver blade was critical - too
deep and it would break through the taper, too little and the tip
wouldn't screw home. The first attempt at this weakened the part so
much that during facing the end to length, the part split - an
evening's work down the pan :-( .
A further difficulty was that I drilled the end to hold the
tip
strengthening pin after turning the taper and subsequently realised the
hole was not exactly square to the body. If you look carefully at the
cap on the actual stylus then this misalignment can be seen.
|
 |
 |
|
|
|
The tip assembly, body
with screwdriver blade fitted and cap
assembly.
|
Test-fitting in a Palm
Tungsten E. The cap was shaped by
hand to meet the compound top shape of the PDA using a Dremel
fitted with a miniature drum sander.
|
|
|
|
")
")
")
")