Step 1 – Act quickly.
You need to give the phone time to dry out naturally (a few hours in a warm dry place) , but once you're convinced it won't work again then you'll need to disassemble it fairly quickly. I waited about four hours and by the time I took it apart, parts of it had already started to show signs of rust. As most people can't be without their phone for more than a few minutes this shouldn't be a problem.
Step 2 – Assemble the bits you'll need.
- A Watchmaker's screwdriver set.
- Possibly, a Torx screwdriver (small)
- Vaseline
- Tissues
- Isopropyl Alcohol or similar
- An Air Duster, if possible
- Cotton buds
- One or more small pots to keep the screws etc in. You'll almost certainly lose them otherwise.
- A digital camera - use this to photograph each key assembly step, in case you forget how to put it back together (I know, you always use the camera in your phone ...)
Step 3 – Take anti-static precautions.
The electronic components in the phone can easily get damaged by static discharge. Ideally you should have a conductive wrist strap with a wire connected to earth. At the very least you should earth yourself before you touch any of the internal parts of the phone. Examples of typical things at earth potential are metal radiators and electrical appliances with a metal case (plugged in, but not necessarily switched on).
Step 4 – Remove the covers & SIM card
First, remove the battery and the SIM card. Dry the battery and SIM card's contacts using the tissue.Then remove the phone's covers. These may be easily removable if your phone can take different 'skins'. Otherwise, you should be able to pop the covers off or lever them off with a screwdriver.
Step 5 – Separate the keypad & display module.
The phone is most likely assembled as a 'sandwich' of two or more printed circuit board modules. In the Nokia phone here, there is a keypad & display module, a main circuit board and a rear panel module.Start by removing the keypad and display module
You may find that the boards are held together with 'Torx' security screws with star-shaped heads. Ideally, you should use the proper tool for this but I didn't have a Torx-headded driver of the small size used. However, it was possible to use a watchmakers screwdriver, carefully lodged in the head.
To be extra safe, you might want to note where each screw came from, so it can go back in the same hole.
Once you've removed everything holding it together, carefully separate it from the rest of the phone. In the Nokia there is a small square 10-pin connector (seen at the top of the modules in the photo's) that make the electrical connections.
 |
 |
Step 6 – Separate the remaining modules.
The connectors are the most likely source of problems from the wet phone. You are aiming to expose all the connectors so they can be dried out. In the Nokia it was a case of separating the rear module from the main PCB.At this stage look carefully for all the mating contacts. In the photo, you can see the SIM card connectors and the inter-module gold plated connectors.

Step 7 – Dry out all exposed contacts.
Now dry out everything in sight. Use the tissues at first if there is a lot of water paying special attention to the connectors. Also wipe dry the PCB especially where tracks run in parallel. Some parts of the circuit may have relatively high impedance inputs and any dampness will look like a short circuit.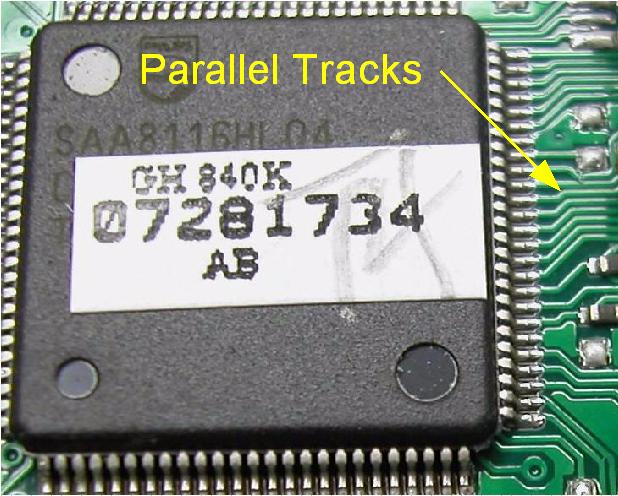
You should also clean the keyboard contacts. In most phones the keypad is a peel-off set of rubberised keys with contacts on the back. Note carefully the position of the keypad 'mat'. When you peel the keypad off you'll probably see lots of gold-plated contacts. Clean each of these they same way as the other contacts.
If you have an air duster, use it to blow away any hard-to-access wet or damp patches. Use a magnifying glass to inspect everything very closely
Step 8 – Clean the contacts.
As an extra precaution, ensure all the connector contacts are completely clean and grease-free. Use the isopropyl alcohol on a cotton bud using a wiping, twisting motion, as shown in the photo.
Step 9 – Re-assemble the phone.
Now you are ready to put the thing back together again. Put it back together in the reverse order, taking extra special care with connectors.. Remember, these connectors are not going to be designed for multiple insertion cycles.When you replace the keypad, make sure it's lined up correctly.
Take your time and if anything feels too tight, don't force it - look to see what the problem might be. I had exactly this issue when I came to screw the keypad/display module back on. The self-tapping screws got very tight towards for the last turn or so. After checking they weren't cross-threaded, I decided to put a smear of vaseline on them. This time they went in OK.
Finally, insert the SIM card and the battery.

Step 10 – Test it out.
Now the moment of truth. Switch the phone on. It's probably either going to work or not. If it's still completely dead, and you're sure you re-assembled it OK, then it's good news - you've got a solid excuse for getting a nice brand new phone - because at least you tried to mend it. And if you're like me, you've also taken the thing apart to see how it works, especially that little vibrating alarm thingy.If on the other hand, it springs back into life, then well done! You've cheated those rich multi-national fat-cats out of even more profit and saved the planet some resources.
You may even feel so happy about bringing your phone back to life that you'd like to buy me a beer. Feel free! Click the link below!